Some people have troubles with the USB
cradle or cable, because of software incompatibility
(ex. with Windows NT 4.0 or Windows 95 lack
of USB support) or hardware limitations
(no USB port on an old computer), or simply
want to connect external devices like a
GPS to the Clie. Sony isn't currently selling
serial cable, only a serial cradle for the
PEG-S300
/ PEG-S500C,
and if you don't want to carry a cradle
with you all the time, or if you've got
a PEG-N700C
/ PEG-N710C,
you have no choice but build your own cable.
Fortunately, this is a simple task, although
maybe a bit expensive...
| Step 1: Disassembling the USB cable |
| First unscrew the two small
screws to open the Clie-side connector
(not the USB-side one). |
 |
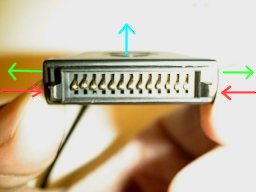
| The connector case is kept
closed by additional plastic tabs on
each side of the connector. (see picture
of the opened connector) |
 |
| In order to unlock those
plastic tabs, you need to press
gently on the connector sides
(lower par of the case) as shown on
picture, and pull
slightly outward the lateral
sides of the upper part of the case.
You can then lift
the upper cover upward to open
it. |
 |
| Once the connector case
is opened, separate the case from the
connector and its attached cable. |
|
| Step 2: The actual cable modification |
You can now use the soldering iron
to disconnect all the wires from the USB
cable, and remove the small resistor as
well, leaving the connector empty.
Connect now the wires from your serial
cable to the connector using the following
table (if you're using a cable with molded
connectors, you'll have first to find
out which wire goes to which pin on the
DB9 connector):
Clie
Connector |
Signal |
USB+ |
USB- |
DTR |
RXD |
RTS |
TXD |
CTS |
DC_IN |
DC_IN |
HotSync |
DC_OUT |
CNT |
GND |
| Pin # |
1 |
2 |
3 |
4 |
5 |
6 |
7 |
8 |
9 |
10 |
11 |
12 |
13 |
| Direction |
|
 |
|
 |
 |
|
|
|
|
|
|
|
|
 |
Serial DB9
Connector |
Pin # |
NC |
NC |
6 |
3 |
8 |
2 |
7 |
NC |
NC |
NC |
NC |
NC |
5 |
| Signal |
|
|
DSR |
TXD |
CTS |
RXD |
RTS |
|
|
|
|
|
GND |
(NC = not connected)
|
The 51 kohm resistor is to be soldered
between the #12 and #13 pins of the
Clie connector, as showm on picture.
Be carefull to connect the ground wire
to the correct side of the resistor:
 |
 |
| Step 3: closing the connector case again
|
Now that the hardest part is finished, take a breath and proceed to the final part.
Put the connector in the lower case,
ensure that everything fits correctly
inside the case (you'll certainly need
to bend carefully the resistor so that
you can put everything in the case).
Depending on the serial cable diameter,
you might need to adapt it so that the
cable is tightly locked into position
when the connector case is closed again,
otherwise you'll tear the connections
away if you pull the cable... Put the upper half cover into position. It should lock with the plastic tabs |
| Step 4: test your cable
|
| If the tests are sucessful, put the 2 screws back, relax and enjoy your new serial cable! ;-)
|